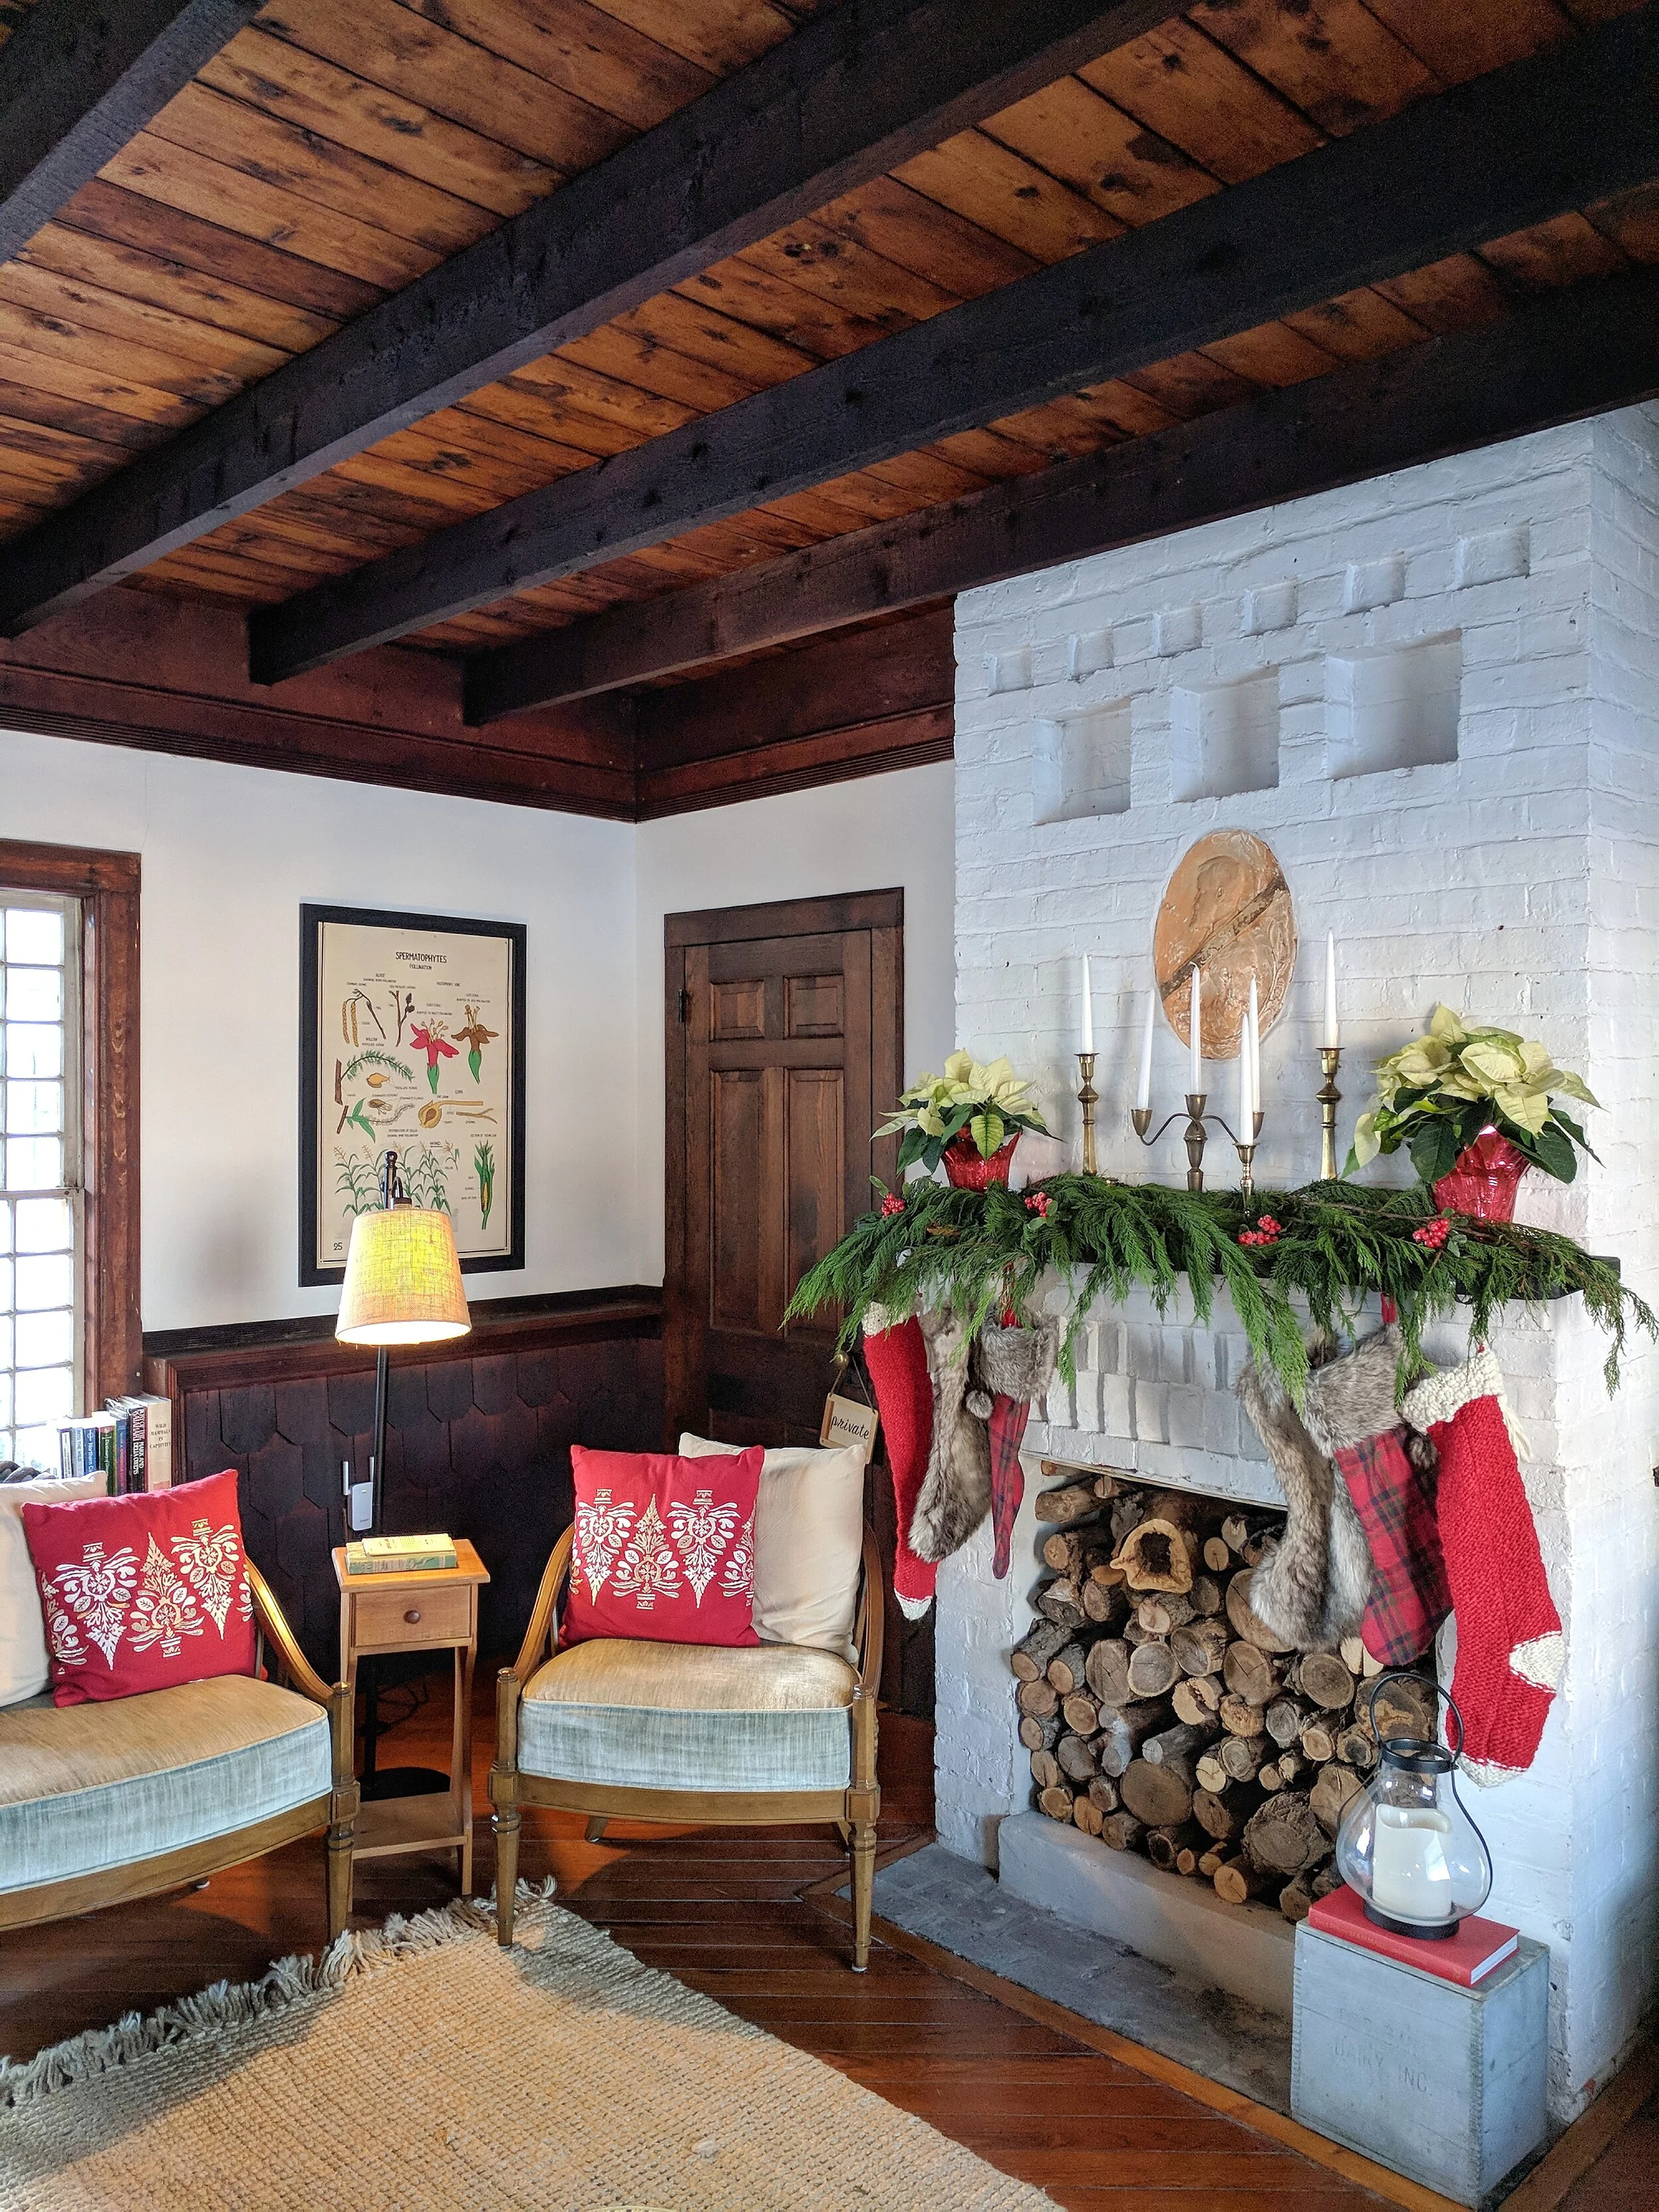
Join us for the a Holiday House Tour of Content + Co in New Jersey. Sharing vintage and traditional Christmas inspiration for your home!
Read moreRENOVATION REVEAL: Content Master Bathroom
Sharing the renovation reveal of our Master Bathroom with before and after images, plus all the nitty gritty design details that went into making this my favorite space in Content.
Read moreDIY: Customized Exterior Door Mats
DIY Customized Exterior Door Mats
While I daydream about sweeping up construction dust for the very last time (ha ha, yeah right), I've been doing a few DIY projects of my own.
As we begin to organize and dig out our remaining boxed items, stored on the other side of the house, John and I realize, we have no way of differentiating all the other rooms we have yet to renovate.
In a regular house, identifying a room is done by location, but this is not a typical house. This is a once brothel, hacienda-style property, where all the rooms connect not only to one another, but to the center courtyard.
In a normal scenario, one would simply say, "down the hall, third door on the right." But at Content, which "hall" are you referring to? The interior hallway, or the exterior porch which each room can be accessed from.
What ends up happening is:
John: "Court, where's the box of camping supplies?"
Courtney: "In the first bedroom."
John: "First at the front or back of the house?"
Courtney: "At the front of the house. With the yellow paint. The one closest to the Great Room. You know which one I mean, right?"
John: "Never mind, I'll find it myself..."
It’s not a serious problem, of course, but an identification system was in order.
As a full renovation of the west side of Content. will be on going for the next year (hoping to be completed by summer 2016!), we needed a simple identification system to run with. Then I remember our friend Megan.
See, each year we do a DIY craft, holiday gift exchange among us girls. Each lady crafts a gift, and then we do a swap (ala white elephant rules) where you can steal gifts back and forth. It's stressful, and fun, and hysterical. Always a great time, I highly recommend you host one!
So, Megan crafted a coir entry mat, in which she'd created text on the mat reading "Hi" as you were entering the door, and "Bye" as you exited. (Megan, correct me if I have this wrong... I think that was Holiday Craft Swap 2012, so time and mimosas may have fogged my memory).
Anywho, it was adorable, and I always remembered it!
Fast forward to 2015, I'm at the store, and see these simple entry mats, and remember Megan's craft. I'm inspired and our new bedroom identification system is born.
For you, this DIY project can translate in a number of ways. For one, it makes for a great gift (hi family, stop reading or spoiler alert, you're all getting door mats for Christmas this year) or a really easy way to personalize your own entry mat with your house number or witty saying.
DIY: Customized Entry Door Mats
Supplies:
Measuring tape (for small projects)
Butcher paper or recycled cardboard
Spray Paint(s) - choose any color darker than the mat
Disposable gloves (spray paint is messy)
Step 1: Source A Natural Fiber Mat
I purchased mine from Ikea on the CHEAP for $4.99 each. Truth be told, the Ikea mats are very thin, so you may want to find something a bit more substantial. I easily found more online.
SOURCING TIP:
The key is to find a coir mat, that is tight. Meaning the fiber is very sturdy and bound close together.
This will insure the painted stencil has a firm surface to adhere to.
Step 2: Set Your Stencils
Using your measuring tape, find the center of the mat and line your stencil(s) up according to the layout you would like to achieve.
** Note: The stencils used in this DIY are 6". **
For my mats, I was only doing single digits, so honestly I eyeballed my measurements. However, to achieve a multi number arrangement, you may want to be more accurate arranging the stencils in advance or perhaps off setting the digits in a corner using the side of the mat as a starting edge.
Step 3: Mask the Area
With the stencils arranged, place masking tape fully around the stencils so they are affixed to the mat (or to each other) and can not slide; keeping all inner edges of the stencil exposed.
The making tape, on the exterior stencil edge, will begin to create a barrier for the spray paint from the rest of the mat.
To cover the remaining perimeter, use more tape or affix a few strips of paper (butcher, news, etc.) or cardboard fully covering the remaining exposed edges.
Place the whole mat on a drop cloth.
Step 4: Paint
With the spray paint can positioned parallel to the mat, use short, precise strokes 5" over the stencil. Try not to tilt the spray nozzle, as a top mist over the stencil will produce the best result.
Note here, it's less about getting the fibers saturated with pigment, and more about getting a clean sweep of paint across the stencil and around the edges.
Step 5: Set The Paint
Allow the paint to set for 10-15 minutes, then remove the stencil.
Step 6: Allow Paint To Dry
Allow paint to dry for a minimum of 24-48 hours before using or gifting. Though the paint will dry fast, allowing extra dry time will ensure no paint is tracked into the house.
Pretty manageable, right? Most of the work time of this project is prepping the surface. I will say though, I got lazy on #4, and did not mask off the perimeter fully.
I underestimated the range that the spray paint would span and you can see a dark haze around my number "4" mat.
Learn from my laziness. Make sure you don't skimp on Step 3! Cover the perimeter of the mat fully for best results.
From here, sky's is the limit. On my next attempt at this project, I plan to use different width painters tape to create striped perimeters around the outside edges.
Or, you can use specific paint colors to create a more personalized look that matches your decor.
What do you think, will you give this project a go? Share your thoughts below!
DIY: Refinish An Audio Visual Projector Cart
Learn how we refinished this vintage audio visual projector cart into a bar cart and bathroom storage cart.
Read moreIndustrial Extra Long Curtain Rods DIY Tutorial
Happy Spring everyone! I want to share a fun, DIY project that we did for the master bedroom; our Industrial Curtain Rods.
I've seen a few different versions on Pinterest, but wanted to put our own spin on this trend.
Not only can you tackle this project in one-day, you can do it without breaking the bank!
Industrial Pipe Curtain Rods DIY Tutorial
Time: 1.5 hours of prep, 30 minutes for install
Cost: $30 per curtain rod, with (2) mounts
Skill Level: Basic tools, comfortable on a ladder
The need for this project became pretty apparent when I started shopping for a curtain rod that would span our four, street facing windows.
Holy hat! Extra long curtain rods are expensive! And since we moved in this past weekend (YAHH!), we had to figure out a quick solution.
I reasoned with spending a little more on the curtains themselves because they had to be lined (not too sheer or see through) and 84" long, but I couldn't wrap my head around spending hundreds on hardware.
Step 1: Check out inspiration online
Gather inspiration on Pinterest or in person, if you can. There is absolutely no sense in doing all this work and not being totally stoked on the finished product.
I'm a very visual person, so I visited our friends Stephanie + Mike who recently installed similar black pipe curtain rods throughout their entire house, and they look awesome, so I had some pretty solid inspiration! I consulted with Mike, and I'll share his tips as we go.
Step 2: Sketch a quick design plan
Determine how long of a curtain rod you want. Will the rod cover one window, two or span the length of several, like mine?
Make a quick sketch of the window. Measure the width of your window(s) including the trim around the window. Then measure again. Then wait a bit, think it through and measure again.
Half kidding, but a practical tip. Because the rod itself will not be cut by you (at home), and you cannot re-cut it due to personal error (unless you want to spend more money), your detailed measurements and drawing will be a helpful reference when you need it most.
Here's where you have to do a little, forward design prepping. You need to make two decisions:
1. How far beyond the window trim would you like the end of the rod or curtain to extend? For me, I decided on a simple 2" on each ends = 4" total. If you want the curtain to have a lot of extra room on the outer edge of the window when open, make sure you compensate for more.
Now add those extra inches to the overall width measurement and this will account for a decorative overhang on the ends.
2. How far out from the wall does the curtain need to hang to clear the window sill and trim? Here again, 2 inches was enough.
Step 3: Purchase and cut.
Assuming you do not own a pipe cutting machine, you will need to seek professional assistance. With measurements in hand, head to your favorite home improvement store.
I do not recommend going on a Saturday at 11:00am, because every weekend warrior/ DIYer will also be there. Try to go before 9am or at an off-peak hour like dinner time.
Depending on how many industrial curtain rods you're making, the pipe cutting process can take awhile to complete, and you'll stand there feeling dumb/helpless, so bring your best attitude and a coffee.
Step 4:
OK, so your at Home Depot (Lowe's / local hardware store). Head to the plumbing aisle, and look for a large machine in the middle of the aisle that looks like this.
Pipe cutting machine.
This is a pipe cutting machine. Find an Associate (AKA your new BFF, or in my case, Frank) and tell Frank you need some pipes cut to length. Frank may assume that you are installing or replacing a natural gas line, to which you can mention your intentions with his pipes (assuming he has a sense of humor) are "decorative." In my case, I got a laugh. Work on your delivery.
At this time, look at the shelves above the Associate and you'll notice two types of pipes. Galvanized steel (silver) or black steel.
Determine which one best works with your style/decor, and tell the Associate, "I need “1/2 inch {galvanized or black} pipe, threaded on both ends."
These pipes come in many different diameters, but 1/2 inch is plenty thick/strong to handle fabric curtains.
My new BFF, Frank.
Hand your new bestie your beautifully, chicken scratch drawing and review the measurements together. (Remind yourself that you are not his first DIYer and you're way more sophisticated than the man he just spent 45 minutes helping make a PVC table - true story.)
From the drawing, the Associate will understand how much pipe is necessary for the full job, and will measure and cut a long (likely 10 foot) piece to your desired dimensions. Each 10 foot pipe is about $15-$20.
Similarly, have the Associate cut a zinc threaded rod into 2 inch sections. You will need (1) 2 inch section per mount. If you're only making (1) curtain rod, you'll have a bunch left over, but I'm sure you'll find something crafty to do with it.
Now stand back and watch your BFF in action!
Step 4: Additional Hardware
Aside from the pipe, you will need some additional hardware for installation. Because we decided to use galvanized pipe, we matched the hardware with galvanized fittings.
At Home Depot the fittings are color coded, so for this project, we were looking for 1/2 inch (pink coded) fittings.
Whichever metal you choose, feel free to mix and match the finish, just make sure you buy 1/2 inch fittings
.
Here is what you will need to replicate our curtain rods. This list is per curtain rod:
(2) Split-Ring Pipe Hangers
3/8 x 36" Zinc Threaded Rod
(2) 3/8 Ceiling Plate; used here as a wall plate
(2) Iron Caps
(4) #12 x 2 inch screws
Dry wall anchors (optional based on your wall)
Top: Split ring pipe hanger. Bottom: 3/8 inch zinc threaded rod cut into 2" sections
3/8 ceiling plate, used here as a wall plate.
1/2 inch galvanized iron cap
Step 5:
With your purchases in hand, wave Frank goodbye and tell him if this project doesn't kill you, you hope to see him soon. To which Frank will promptly take his coffee break and pray that blogs like this don't get "repinned" too often.
Start by laying out all of your purchases.
IMPORTANT: Steel pipes and pipe cutting is accompanied by lots of grease and oil. This grease and oil will stain your pretty new curtains, so here's a good tip from my friend Mike:
Make sure you clean the hell out of them with a strong degreaser or household cleaner like 409. Any product made for cleaning kitchen grease will help. Make sure to get in all the threads really well.
Make sure you thoroughly clean ALL of the industrial curtain rod parts and hardware really well with a degreaser or 409.
Step 6: Gather your tools for installation
Ladder
Pencil
Painters/ non-stick tape (as opposed to writing on the wall, painters tape is an easier way than marking up the wall)
Step 7: Decide on your curtain before installation.
Start by manually test hanging the curtain on the rod and holding the rod up to your desired height and ensure it falls correctly. A friend is helpful here! Man, where's Frank when you need him. Depending on your curtain's length, determine where you would like the rod to live.
Here's my tip. Don't over complicate this. Simply eye ball the location of where you want the industrial curtain rods to be and determine the approximate location above the trim.
Take a look below. I wanted the curtain to be much higher, so I measured up from the corner of the trim 5 inches and over 2 inches. Mark this center spot with an "x". This center spot will be the middle of the wall plate's center opening and directly in line with the threaded rod.
Holding up the wall plate to the wall, center your "x" on the middle opening, and use your level on the side of the plate to ensure the plate is vertically straight. Once straight, use your pencil to trace the top and bottom openings onto the wall.
Top opening: Screw
Middle: Threaded rod
Bottom: Screw
Repeat this above process on both sides of the window.
Step 8:
Now that you have the location of the wall plates marked, you will need to determine how lucky you are and if there is a wall stud to mount the plate to. You can determine this with an electric stud finder. ** If you're my husband, you've placed the stud finder on your chest and are now beeping loudly.
If there is no stud, a dry wall anchor will be necessary.
Step 9:
If there is a stud, drill a pilot hole through the top and bottom circle marks you just made and secure the plate to the wall with the wood screws.
Thread the 2 inch rod piece into the center opening and add the split ring hanger to the threaded rod end. Be sure not to over thread, as the pipe will need to fit in the open space between.
Wall plate secured with screws, center threaded rod screwed in.
Be sure not to over thread the split ring, and leave plenty of room for the 1/2 inch pipe to pass through.
Repeat this step on each side.
Step 10:
If your industrial pipe curtain rod is long, find your friend again. With the pipe dressed with your curtain, loosen the split ring, place the pipe in between and tighten the outer ring screw making a secure closure on both sides.
Finally, thread on the end caps for a finished, industrial look.
All in, each curtain rod with (2) matching mounts cost approximately $30 and 30 minutes of installation.
I will admit,John was my project buddy and helped guided me through this process but I feel completely confident, having only done this once, that you could easily follow these steps & do it too!
Want to see more curtain inspiration? Check out the reveal of guest suite #2.